Maintain Special Assessments
Navigate:  Tax >
Special Assessments > Special
Assessment Maintenance > [search
for and select Special Assessment]
Tax >
Special Assessments > Special
Assessment Maintenance > [search
for and select Special Assessment]
OR
Tax > Special Assessments
> Special Assessment
Maintenance > [add Special Assessment and save]
Description
Edit existing special assessments. Category and Calculation type are set when the special assessment was created and cannot be changed.
NOTE: Additional tabs are displayed if the calculation type is Rate Table or Amortized Charges. The tabs displayed include:
-
Associated TAGs (California only)
Workflow
A New Fund (NewFund) workflow is kicked off from the Levy Management Maintain Jurisdictional Change Transaction Item screen when a new special assessment is created on that screen. When selected from the workflow, this screen also includes Accept/Reject buttons.
Depending on your user rights and roles, you can then process the new special assessment. When selected, the Maintain Special Assessments screen opens and you can accept or reject the new special assessment.
- If you select Accept, enter a note and click Finish.
- If you select Reject, the new special assessment is kicked back to a new workflow, also called New Fund, for further maintenance and submission for review.
Jurisdiction
Specific Information
California
-
Special assessment-TAG associations can be created on this screen. The associations are validated during a Special Assessment Import when Fixed is the type of import selected and when the Special Assessment Associate TAGs to a Special Assessment application setting is set to True. When setting to True, the Associated TAGs panel displays on the Maintain Special Assessments screen.
-
UDFCd = EffDateCntrl: When present, the IsHidden setting of the UDF will control whether the standard effective year control is shown in the upper right. A normal prompt is not shown.
-
UDFCd = vtag: Will be prompted for as normal. If it has the value True for a given import instance, the import will be validated to ensure that each special assessment revenue object being imported belongs to a TAG that is associated to the Special Assessment. The Special Assessment application setting Associated TAG(s) to a Special Assessment controls this.
NOTE for implementors: The SA import screen supports UDFs to be prompted for each import instance. These should be created with ObjectType=SAImportType, ObjectId={SAImportType systype Id}. When the import is run, the UDF Data values are saved and associated with the SA Import Instance, so that they can be used in custom validations or calculations. Some UDFCds have special meaning:
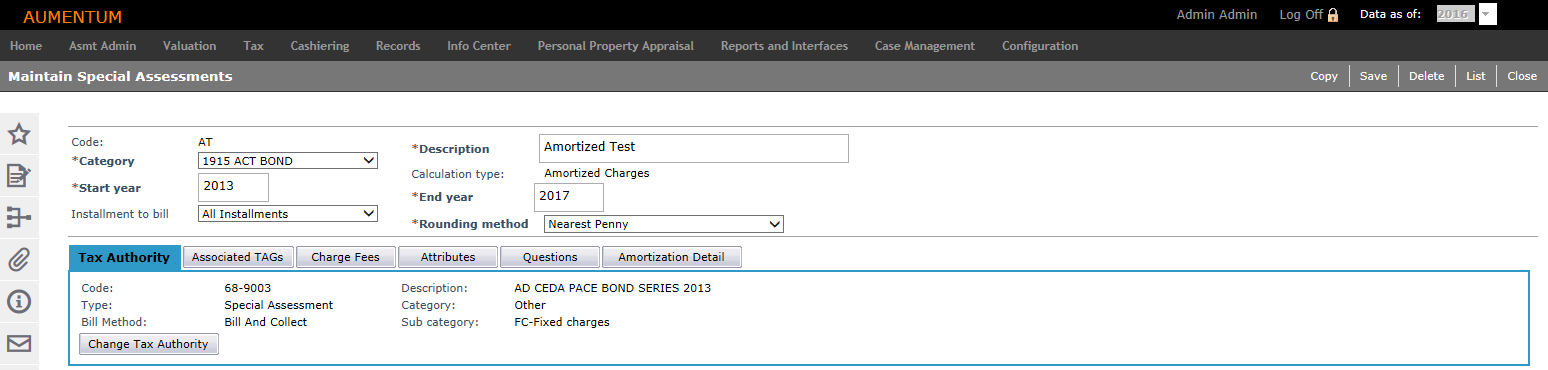
General Special Assessment Information and Tax Authority Tab
-
On the Maintain Special Assessments screen, verify the information in the header area.
NOTE: Code and Calculation type are read-only. Amortized special assessments must have an end year.
Select the Separate bill required checkbox if you want this special assessment to be included on a bill separate from the ad-valorem taxes.
NOTE: This checkbox only displays if one of the following Special Assessment application settings is set to True: Create Separate SPA Bill (One Bill for All Specials) or Create Separate SPA Bill (Individual Bills per SPA). You cannot have both of these settings set to True at the same time. -
In the Tax Authority tab, verify the Tax Authority information and click Change Tax Authority to update it, if necessary.
NOTE: A new fund is created when a new special assessment is created; not when adding or changing a tax authority on a special assessment. The fund association is moved to the new tax authority for the special assessment.
-
Any Primary and Secondary that you associated with the special assessment TAG on the Maintain Tax Authority screen is displayed on these tabs. Click a tab to view the associated legal party.
NOTE: This panel does not display unless a legal party has been associated with the TAG and special assessment.
-
Click Save if you made any changes.
Associated TAGs Tab
NOTE: This tab may not apply to your jurisdiction.
This tab displays only if the Special Assessment application setting Associate TAG(s) to a Special Assessment is set to True. See Special Assessment Maintenance for details.
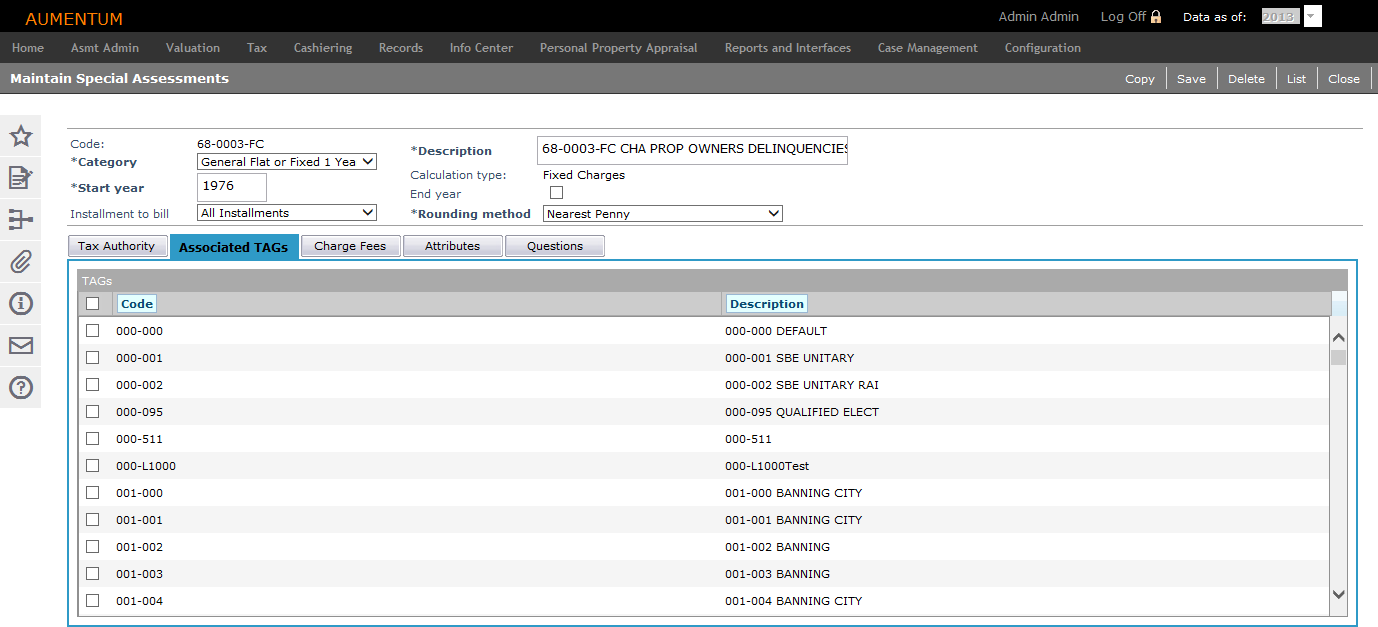
Select the checkbox next to each TAG you want to associate with the special assessment and click Save. The grid is sortable by either the Code (short description) or Description with the selected TAGs remaining at the top of the list.
Charge Fees Tab

Select the checkbox next to each Charge Fee you want to associate with the special assessment and click Save.
NOTE: Only charge fees that are active in the current tax year are displayed. Fees are set up via Tax > Special Assessments > Setup > Fees and Discounts.
Attributes Tab
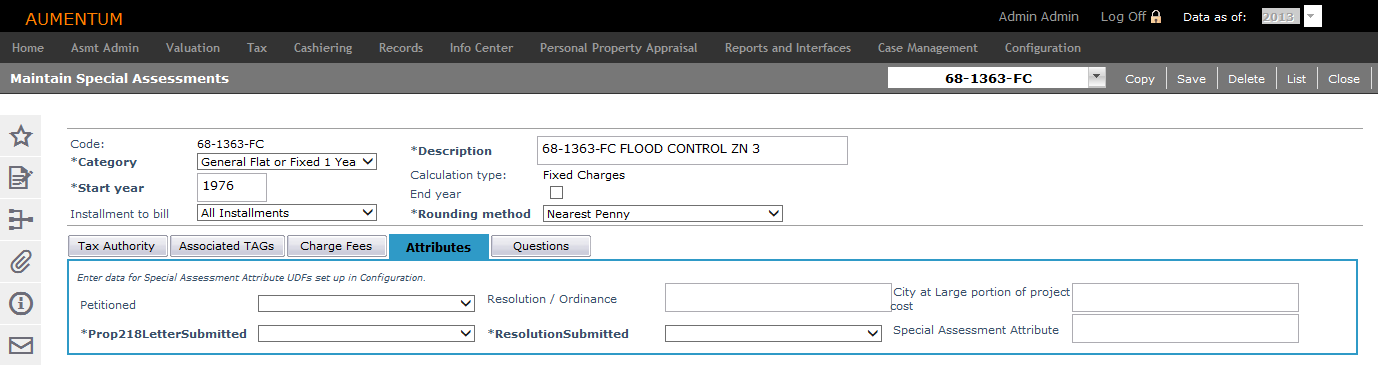
Attributes with an asterisk and in bold are required; however, they have no impact on calculations or other Special Assessment processes. They are informational only.
Attributes are created via Configuration > User-Defined Fields and need to have an Object type of Special Assessment. You can choose from a variety of field types, such as a Yes/No checkbox, Decimal, Character, Systype, and Numeric.
Questions Tab
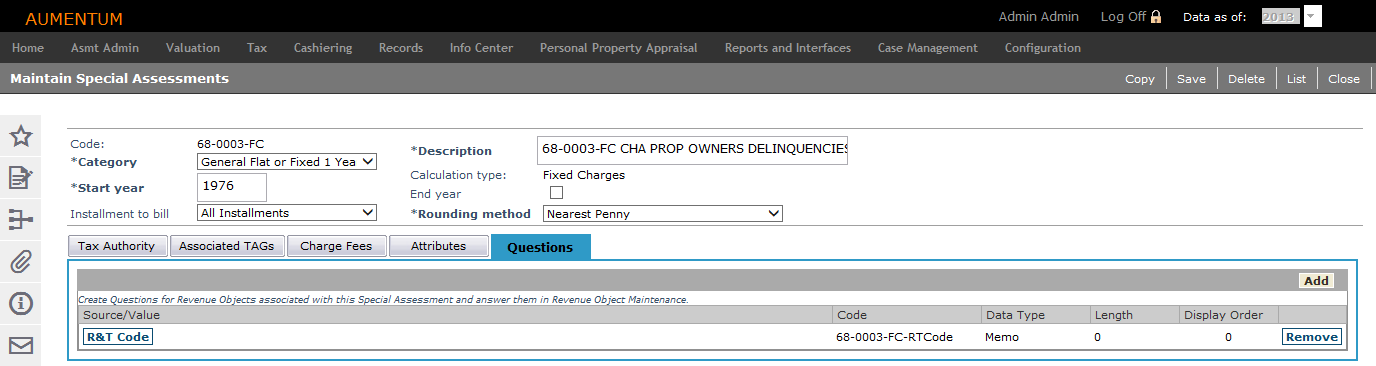
Create questions for Revenue Objects in this special assessment. Questions are answered via Tax > Special Assessments > Revenue Object Maintenance.
-
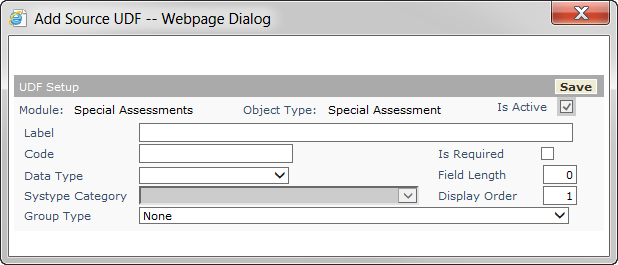
Click Add to create a question.

-
In the Add Source UDF pop-up, enter a label and code.
-
If the question is mandatory, select the Is required checkbox.
-
Make a selection from the Data Type drop-down list.
-
Enter the Field Length or Systype Category, as determined by the Data Type.
-
Enter a display order for the question.
-
Make a selection from the Group Type drop-down list, if necessary.
-
Click Save. The pop-up closes and your question appears in the Questions tab.
-
Click Remove to delete this question from the special assessment.
-
Click the link in the Source/Value column to edit it.
-
In the Edit Source UDF pop-up, clear the Is Active checkbox to deactivate the question.
-
Click Save. The pop-up closes automatically.
-
Click Save in the Command Item bar.
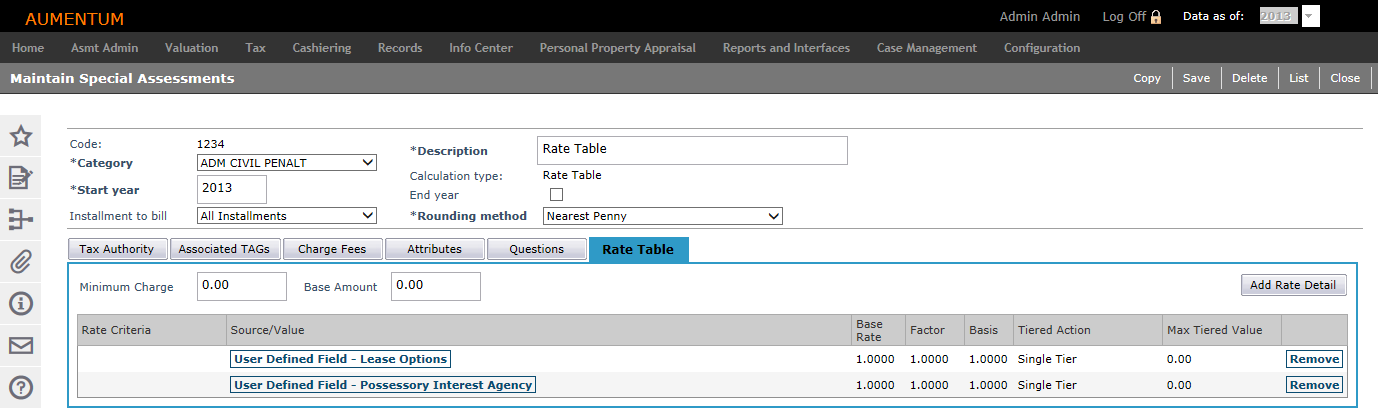
Rate Table Special Assessments
The rate calculation formula is [value*] * [base rate] * [factor] * [basis] + [base amount]. If the calculation results in a value less than the minimum charge, the result is set to the minimum charge.
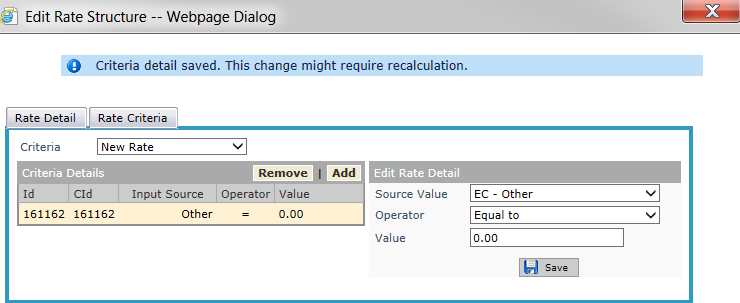
IMPORTANT: Making changes to rates may require the special assessment to be recalculated.
-
Click Add Rate Detail to add a new rate line.
OR
Click on the Source/Value hyperlink.
-
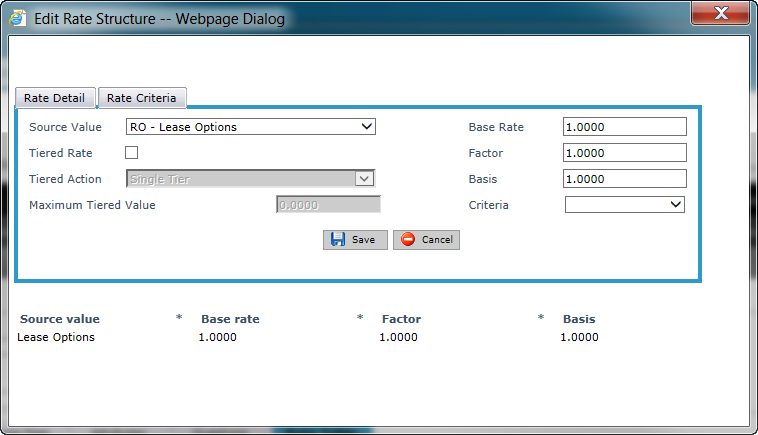
In the Edit Rate Structure pop-up, make a selection from the Source Value drop-down list.
-
Select the Tiered Rate checkbox, if applicable.
-
If selected, make a selection from the Tiered Action drop-down list.
-
Enter a Maximum Tiered Value, if applicable.
A tiered action of Single Tier performs the calculation once by comparing the input value to the maximum tiered value to find the rate. For example, an input value of 52 in the following single step rate structure would calculate a charge of 52 * 25 = 1300.
Rate
Maximum
105
4
95
16
85
26
75
34
65
40
25
9999999
A tiered action of sum of steps will perform the calculation for each applicable tier. For example, using the same information as above the charge would be as follows:
4 (number of units in the first tier) * 105
= 420
+ 12 (number of units in the second tier) * 95
= 1140
+ 10 (number of units in the third tier) * 85
= 850
+ 8 (number of units in the fourth tier) * 75
= 600
+ 6 (number of units in the fifth tier) * 65
= 390
+ 12 (number of units in the second tier) * 25
= 300
Total
= 3700
-
-
Enter the Base Rate, Factor, and Basis.
-
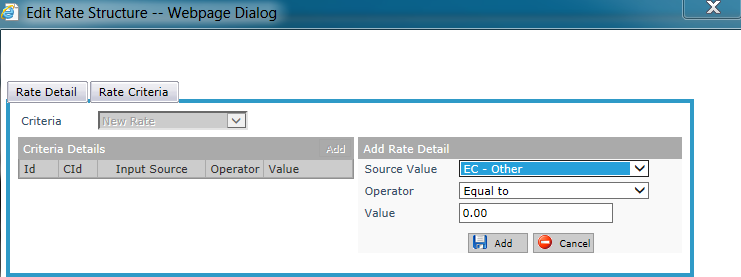
Make a selection from the Criteria drop-down list.
OR
Select <Create New>.
-
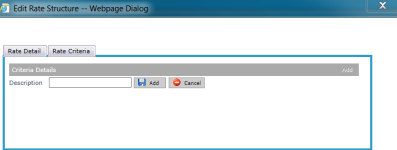
In the Rate Criteria tab, enter a description and click Add. This step is only available when creating new rate criteria.
-
In the Criteria Details panel, click Add.

-
In the Criteria Details panel, click Add.
Click the Rate Detail tab to return to select your new criteria.

In the Add Rate Detail panel, make a selection from the Source Value and Operator drop-down lists. Enter a Value and click Add.
-
-
Click Save. The pop-up automatically.

Steps for Amortization Detail Tab
Depending on the assessment method you choose, some of these fields may be calculated for you. Calculated values overwrite user-entered values.
-
Set up the general information about the amortized special assessment.
-
Type – These are system and user-defined systypes (systype category Amortized special assessment type).
-
Status
-
Document number – Enter a document number for the special assessment, if needed.
-
-
In the Initial Assessment panel:
-
Assessment method – If you select SquareFootage or FrontFootage , you must also verify that the appropriate User-Defined Fields are set up and that the PINs have values for those UDFs. See the Special Assessment User-Defined Fields topic for more information on specific UDFs used in Special Assessments.
-
PIN Min amount – Enter the minimum amount you want each PIN charged. If the PIN's calculated amount is less than the minimum, the amount is increased to the minimum.
-
Amortization fee – Select a fee to include in the amount to amortize. Fees are set up via Tax > Special Assessments > Setup > Fees and Discounts.
-
Base Cost – Enter a cost for the special assessment.
-
Benefit amount – The dollar amount that is benefited by the project special assessment. This amount is calculated by Aumentum during the calculation process. If you enter an amount here, it will be overwritten by the calculated amount when you calculate the project.
-
Fee amount – The fee amount for the special assessment.
-
Benefit percent – The benefit percent is usually calculated by taking the project budget amount divided by the total benefit amount. This amount must be greater than zero.
-
Total cost – The Base cost plus any fees.
-
Benefit acreage – The number of acres that are benefited by the project special assessment. Acres are calculated by Aumentum during the calculation process. If you enter an amount here, it will be overwritten by the calculated acres when you calculate the project.
-
-
In the Amortization panel:
-
Amortization type – Select the amortization type for your special assessment.
-
Interest rate – Enter an interest rate. For example, enter 5.875 if you want the interest rate to be 5.875% for this special assessment.
-
If you select Multiple Interest Rate / Multi=Year Calculation as the amortization type, the Rate Schedule button displays in place of the Interest rate field.
-
Click Rate Schedule to enter rates for each year of your special assessment. The Amortization Rates pop-up displays.
-
Enter the rates for each year and click Save.
-
Amortize only – Select this checkbox if you want to only amortize the project. The other project calculations are not performed, such as benefit amounts and initial assessment amount.
-
Number of years – This field is read-only. It is calculated from the start year to the end year you entered in the header section of this screen. If you do not enter an end year, 'Forever' displays here and your special assessment is amortized using an end date of 12/31/9999.
-
Rounding method – This rounding method is considered during Special Assessment Calculations.
-
Minimum interest – Enter the minimum amount of interest you want to charge per year.
-
-
In the Bond panel:
-
Bond – Select a bond to associate with the special assessment.
-
Non interest due date – Enter the date that the special assessment must be paid by to not have amortized interest added to the cost.
-
Bond sold date – Enter the date the bonds were sold to cover the cost of the special assessment.
-
Extra days – Enter the number of extra days to wait before charging interest. The number of extra days are taken into consideration when the bonds to finance a project are sold in advance and the additional interest to cover the cost of the bonds to complete the special assessment must be included in the calculation of each revenue object.
The numbers of extra days is relative to one year's interest (or 365 days of interest). To begin calculating interest 272 days after the acceptance date, enter -93 for the number of Extra days (365-272 = 93). The interest is then calculated during the Calculations and Postings task: sa amount * interest * (272 ÷ 365). Alternatively, if the number of extra days is after one year, enter a positive number. For example, enter 164 to start interest at day 529. The calculation figures: sa amount * interest * (529 ÷ 365).
-
Bond mature date – The date the bonds mature.
-
-
In the Payoff panel:
-
Non-posted payoff date – Enter the non-posted payoff date.
-
Select the After date restriction associated with the non-posted payoff date from the drop-down list.
-
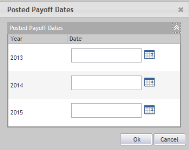
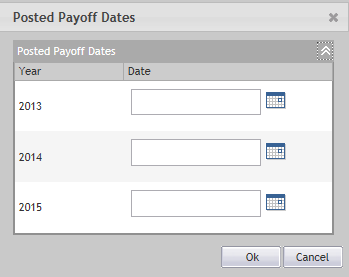
Posted payoff date – Click Edit to enter the date payoffs are due by. The Posted Payoff Dates pop-up displays, where you can enter the payoff dates by tax year. This date is used to determine the payoff method to use. If no date is entered, then the Before date payoff method is always used.
-
Before date payoff method – Select the payoff method for the special assessment to use when paying off this special assessment before the Posted payoff date. If no Posted payoff date is entered, this method is always used for payoffs on this special assessment.
Amortized Payoff Methods are set up in Special Assessment > Setup. After selecting a Payoff method, the Payoff level is defaulted to PIN or you can change the Payoff level to Tract then PIN. -
After date payoff method – Select the payoff method for the special assessment to use when paying off this special assessment after the Posted payoff date. This option only displays after you enter a Posted payoff date. Amortized Payoff Methods are set up in Special Assessment > Setup.
-
Allow partial payments – Select this checkbox if your jurisdiction allows partial payments on special assessments.
-
Payoff level – Select a Payoff level. You can select PIN or Tract.
-
Advance payment solely receipted in Aumentum – Select this option if you prepay non-posted amortized special assessments and want to have that payment recalculate the amortization schedule. If set to false, the amortization schedule does not change after making a payment on a non-posted amortized special assessment.
-
-
Click Save in the Command Item bar.
Tips
The special assessment may need to be re-calculated after adding, changing, or removing the Charge fee. Any PINs associated with this special assessment are changed to a Ready to Calculate status after the fee has been changed. A message displays indicating the number of calculated PINs were affected by the change: "There were 654 calculation transactions affected by the charge fee change "
Use the worklist in the sidebar to edit additional special assessments you selected during your search.
Assessment Methods need to be set up in Tax > Special Assessments > Setup > Assessment Methods if you are creating an amortized special assessment.
Bonds, if needed, are set up in Tax > Special Assessments > Setup > Bonds.
Application Settings can be set via Configuration > Application Settings.
Systypes can be defined on the Configuration > Systypes > Select or Add a Systype screen.
See the Special Assessment User-Defined Fields topic for more information on specific UDFs used in Special Assessments.